Using the Golden Ratio and other design guidelines to determine the perfect quilt border proportions.
You’ve finished piecing a beautiful quilt top. The blocks are perfect, the colors sing, and everything is coming together exactly as planned. Then comes the border decision. Should it be 2 inches? 4 inches? One border? Three? Suddenly, a simple strip of fabric can feel like one of the biggest design decisions in the entire project.

Make the quilt borders too narrow, and the quilt can feel cramped. Too wide, and the borders may overwhelm the design. Add multiple borders, and the challenge becomes even greater. While there is no single “correct” answer, we quilters have long used a few design principles to help create borders that feel balanced and visually pleasing.
One of those principles comes from a mathematical relationship known as the Golden Ratio (sometimes referred to as the Golden Rectangle).
What’s the Golden Ratio?
The Golden Ratio is a proportion that has fascinated artists, architects, and designers for centuries. It is represented by the number: 1.618
This ratio appears frequently in nature, art, architecture, and design because it tends to create proportions that people find pleasing to the eye.
When applied to quilting, the Golden Ratio can help determine border widths that look balanced in relation to the quilt center.
Using the Golden Ratio to Calculate Quilt Border Sizes
Step 1: Determine the width of your inner border – based on the size of your quilt blocks or another design element within the center of the quilt. For example, if you have used a 2” finished sashing between the blocks, a 2” finished sashing for the inner border will create a nice frame around the center of the quilt. If you aren’t using sashing, base your inner border proportionally on the size of your quilt blocks or other primary design element. More about how to do that in a minute.
Step 2: Determine the number of borders you want to include, in addition to your inner border.
Example 1: Inner Border + Single Border
Suppose you’ve decided your inner border will be 4 inches finished. Using the Golden Ratio: 4 × 1.618 = 6.47 (rounded to 6.5″finished, plus .5″ for seam allowance) = 7″.
Your next border could be approximately 6½ inches wide (finished). This creates a pleasing progression between the two borders.
Example 2: Inner Border + Multiple Borders
Many quilts feel more complete with multiple borders. Let’s start with a 3-inch inner border. 3 × 1.618 = 4.85
- Round to 5 inches for the next border. 5 × 1.618 = 8.09
- Round to 8 inches for the outer border.
Your borders would be:
- Inner Border: 3″
- Middle Border: 5″
- Outer Border: 8″
Notice how each border increases proportionally rather than by a fixed amount. Now, does that mean that you need to arrange those progressive borders by size – starting with the narrowest border and ending with the widest border? Nope. Arrange them in whichever order looks best for your particular quilt.
Here’s an example of the same quilt, using the same border fabrics, in the same positions – arranged three different ways. The borders measure 3″, 5″, and 8″. I have changed the position of the borders in each of the three quilts below. Different quilt border arrangements make this same quilt look quite different. Which one do you like best?
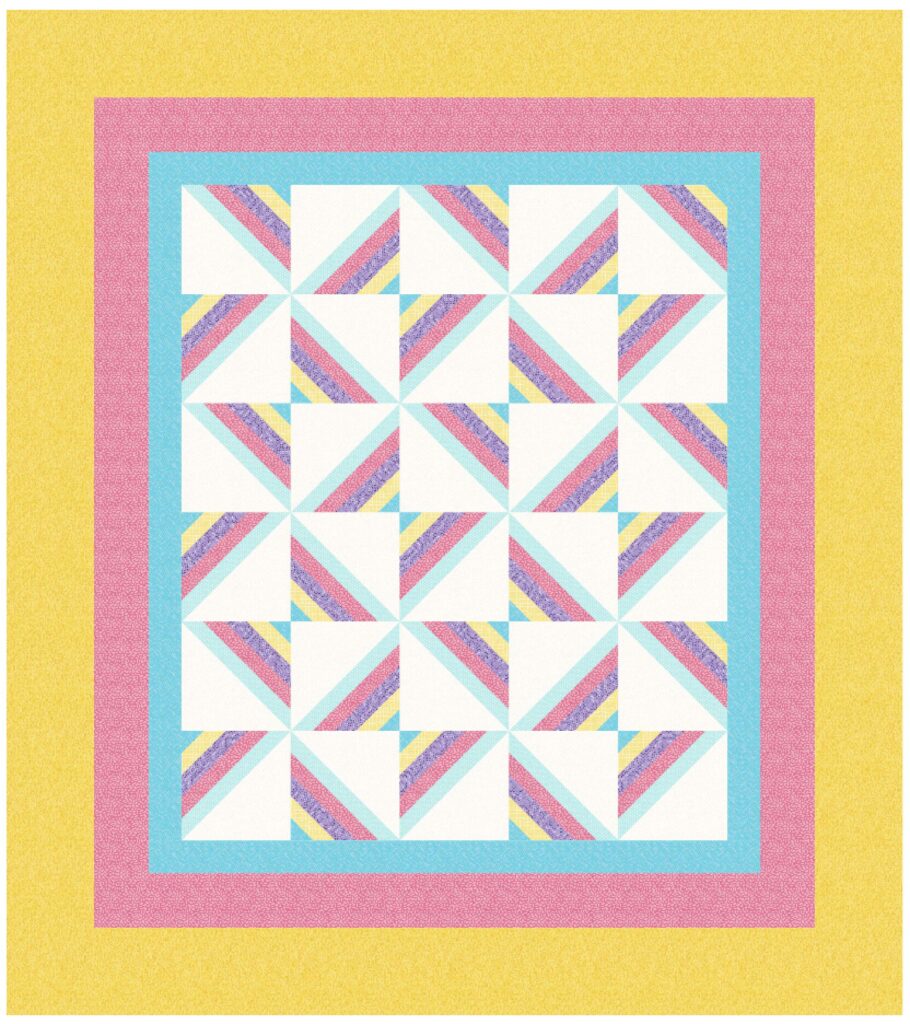
Inner Border: 3″
Middle Border: 5″
Outer Border: 8″
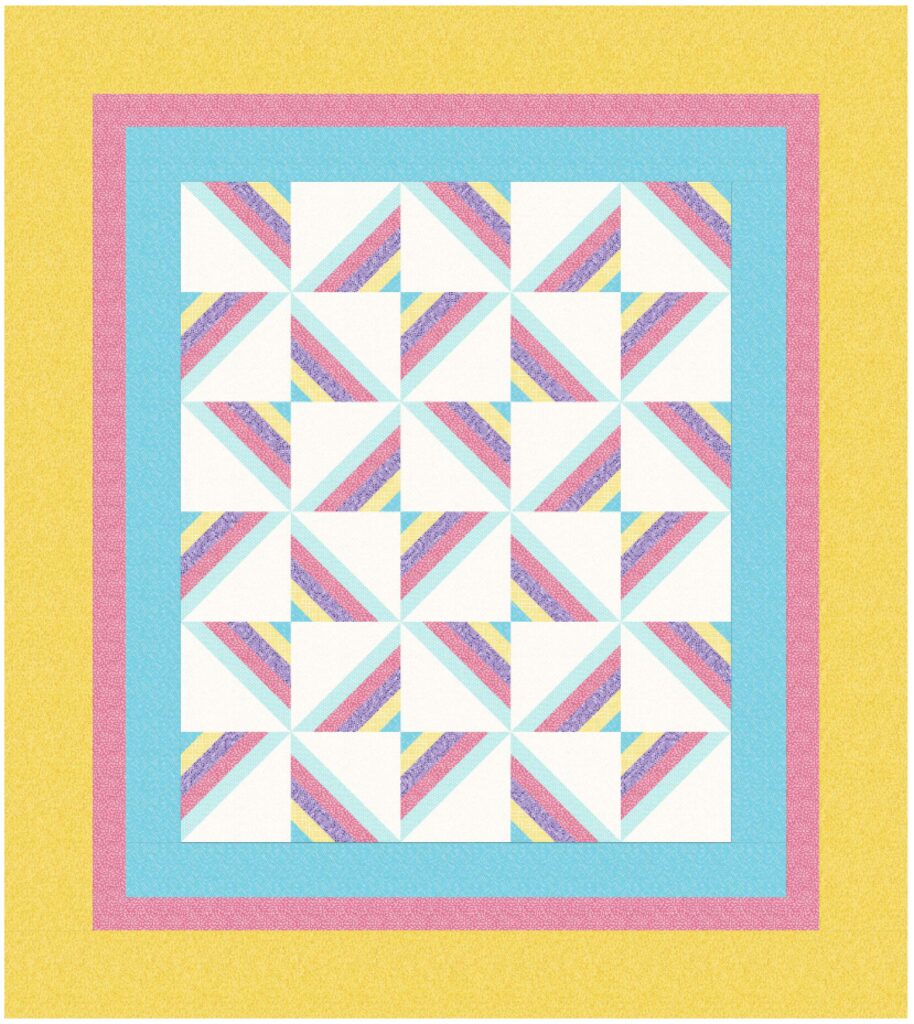
Inner Border: 5″
Middle Border: 3″
Outer Border: 8″
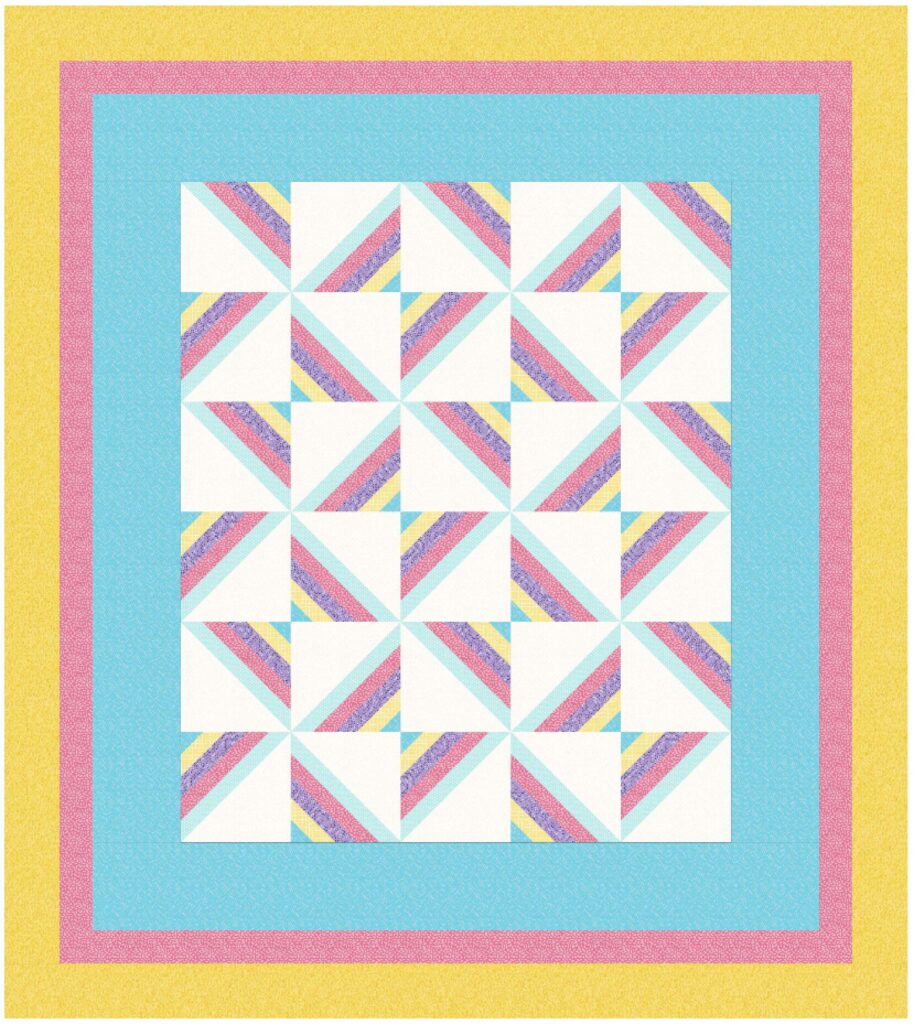
Inner Border: 8″
Middle Border: 3″
Outer Border: 5″
Example 3: A Narrow Border Sequence
Beginning with a 2-inch border:
- Border 1 = 2″
- Border 2 = 2 × 1.618 = 3.2″ (round to 3¼”)
- Border 3 = 3.2 × 1.618 = 5.2″ (round to 5¼”)
This method creates a gradual visual expansion that naturally draws the eye outward from the quilt center.
Working Backwards – Starting with the Outer Border
Sometimes, we might already know what our outer border size should be. That might be because we have selected an interesting border print that’s a specific size, or we want to incorporate pieced or appliqué blocks or other design elements into the outer border. The Golden Ratio still works – except that instead of multiplying by 1.618″, we will divide by 1.618″ to determine sizes of additional borders.
Here’s an example:
- Border 1 (Outer Border) = 8″
- Border 2 (Middle Border) = 8″ * 1.168 = 6.85 (round to 6.75)
- Border 3 (Inner Border) = 6.75 * 1.168 = 5.78 (Round to 5.75)
A Simpler Quilter’s Method
While the Golden Ratio is an interesting design tool, many quilters (including me) prefer a more practical approach based on the size of the blocks used in the quilt.
The goal is simple: choose border widths that divide evenly into the finished block size. This creates a sense of visual harmony because the borders relate directly to the proportions already established in the quilt.
Example: 12-Inch Blocks
If your quilt uses 12-inch finished blocks, consider border widths that divide evenly into 12:
- 1″
- 2″
- 3″
- 4″
- 6″
Any combination of these measurements will typically feel coordinated with the block structure. For example:
- Inner border: 2″
- Outer border: 4″
Or:
- Inner border: 3″
- Middle border: 1″
- Outer border: 6″
Example: 9-Inch Blocks
If your blocks finish at 9 inches, border widths that divide evenly into 9 include:
- 1″
- 3″
- 4½”
Possible border combinations might be:
- 3″ inner border and 4½” outer border
- Three separate 3″ borders
- 1″ accent border combined with a 4½” outer border
Example: 8-Inch Blocks
For 8-inch blocks, common choices include:
- 1″
- 2″
- 4″
A 2-inch inner border paired with a 4-inch outer border often creates a balanced appearance.
When to Break the Rules
Like most quilting “rules,” these guidelines are really just starting points – and I do love to break the rules!
A quilt made from large, bold blocks may need wider borders than the math suggests – or no borders at all. A delicate sampler quilt may look best with several narrow borders.
Sometimes a spectacular border print deserves more space simply because you want to showcase the fabric. Traditional quilts often benefit from structured, proportional borders.
The style of the quilt should always influence your decision.
Before You Cut Your Quilt Borders
- Step back and view the quilt from across the room.
- Consider the scale of the blocks and fabrics.
- Ask yourself whether the borders support or compete with the quilt center.
- Audition border widths by folding fabric strips or using paper strips on a design wall. Take a picture and look at it on your phone. This is a great way to “test” border options.
- Remember that multiple narrow borders can sometimes achieve better balance than one very wide border.
- Trust your eye as much as your calculator.
Border Width Quick Reference Chart
The measurements below are based on the idea of choosing border widths that divide evenly into the finished block size, helping maintain visual harmony between the blocks and the borders.
| Finished Block Size | Quilt Border Widths That Divide Evenly Into the Block |
| 6″ | 1″, 2″, 3″ |
| 8″ | 1″, 2″, 4″ |
| 9″ | 1″, 3″, 4½” |
| 10″ | 1″, 2″, 5″ |
| 12″ | 1″, 2″, 3″, 4″, 6″ |
| 15″ | 1″, 3″, 5″ |
| 16″ | 1″, 2″, 4″, 8″ |
| 20″ | 1″, 2″, 4″, 5″, 10″ |
Examples Using the Chart
12-inch Blocks
- 2″ inner border + 4″ outer border
- 3″ inner border + 6″ outer border
- 1″ accent border + 2″ border + 4″ outer border
15-inch Blocks
- 3″ inner border + 5″ outer border
- 1″ accent border + 3″ border + 5″ outer border
- Multiple 5″ borders for a bold framed appearance
20-inch Blocks
- 2″ inner border + 5″ outer border
- 4″ inner border + 10″ outer border
- 1″ accent border + 4″ border + 5″ outer border
Think of this chart as a starting point rather than a rulebook. If your quilt contains large-scale prints, appliqué, or pieced blocks, you may choose borders that don’t match the chart perfectly. The goal is not mathematical perfection. The goal is to create a quilt that feels balanced, allowing the borders to frame and support the design rather than compete with it.
The Real Goal: Visual Balance
Whether you use the Golden Ratio, block-size proportions, or simply trust your eye, the objective remains the same:
Create borders that feel balanced with the quilt center.
The best quilt border is one that supports the design rather than competing with it. It frames the quilt much like a mat frames a piece of artwork, helping the viewer appreciate the entire composition.
Mathematical formulas can provide a helpful starting point, but don’t be afraid to step back, hang the quilt on a design wall, and simply look at it. Sometimes the quilt itself will tell you exactly what it needs.
Quilting is both an art and a craft, after all. The numbers can guide you, but your creative eye gets the final vote.
I hope this helps!
Happy stitching!