
Nearly every quilter struggles at one time or another – with stitching a perfect 1/4-inch seam (and that includes me). Here’s the thing – pretty much every project we take on uses the phrase – “Use a 1/4-inch seam allowance.”
Simple, right? And yet … if you’ve ever stitched a set of blocks that should fit together perfectly — but somehow don’t — you already know the truth:
A 1/4-inch seam isn’t always just a 1/4 inch seam.
Let’s talk about why that happens, what a “scant” 1/4-inch seam really is, and how a few small adjustments can make a big difference in the accuracy of your quilt top.
The Sneaky Math of Seam Allowances
Here’s the part that catches even seasoned quilters off guard: Tiny differences in seam width don’t stay tiny.
If your seam is just a thread or two wider than 1/4″, each seam “steals” a little bit of fabric from your finished unit. Multiply that across a block … then across a row … then across an entire quilt …
Suddenly:
- Points don’t meet
- Blocks don’t match
- Borders ripple or come up short
It’s not that you did anything wrong — it’s that seam allowances are cumulative. They add up quietly until they don’t.
Standard vs. Scant 1/4-Inch Seams
The Standard 1/4-Inch Seam: This is exactly what it sounds like, a true, measured 1/4 inch from the edge of your fabric to your stitching line.
The Scant 1/4-Inch Seam: A scant 1/4-inch seam is just a hair (or a thread or two) less than a full 1/4-inch. We’re talking about a difference so small you might not see it — but you’ll definitely notice it in your results.
Here’s what the two 1/4-inch seams look like side by side. It’s not very noticeable – but it can make a huge difference over the surface of the quilt top.
Why does this help?
Because fabric has thickness. When you press a seam (especially to one side), the fold takes up space. A scant seam compensates for that “lost” width, helping your finished units measure accurately.
Think of it this way: A scant 1/4-inch seam builds in just enough wiggle room to keep everything lining up the way the pattern intended.
Why Consistency Matters More Than Perfection
Here’s some good news: Perfect seams aren’t the goal — consistent seams are.
If every seam you stitch is the same width, your blocks will behave predictably — even if your seam isn’t exactly 1/4-inch.
But inconsistency? That’s where things start to go sideways.
Tools That Can Help (and Why They Work)
I started my quest for more perfect 1/4-inch seams many years ago by purchasing (and using) a 1/4-inch foot for my machine. I’ve tried both those with and without guides. They do help (a lot) – but not enough for my needs.
From there, I added a strip of painter’s tape 1/4-inch away from my needle and extending forward ahead of the needle to use as a guide for my fabric – before it reached the needle. The tape helps too – but I didn’t always get it perfectly straight – leading to more problems.
Pro tip: If you are trying to adjust the fabric right at the needle in order to get the correct seam allowance – you are too late to make a useful difference, and you could damage your fabric or even break your needle. (ask me how I know that … ).
In search of tools that can actually make a difference, I’ve settled on these. They can be used alone or in combination. All of them are very inexpensive – particularly when you consider how much time and energy you’ll spend with Jack the Ripper – removing seams that you need to re-stitch.
Diagonal Seam Tape:
Add a strip of the tape to the throat of the machine, extending across your extension table. Line the red center line up with your needle. The black lines on either side are a perfect 1/4 inch away from the needle. Perfect seams are much quicker to stitch, and Half-Square Triangles no longer need the stitching lines marked on the fabric. Huge time saver for me!
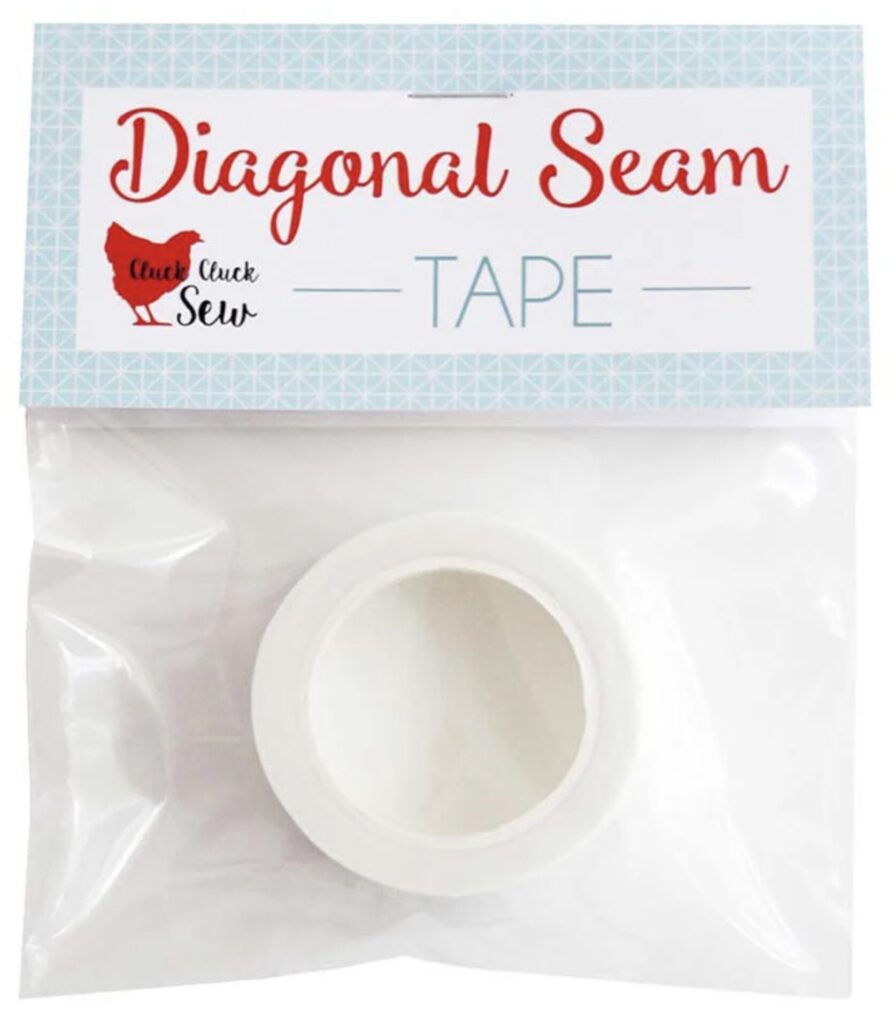
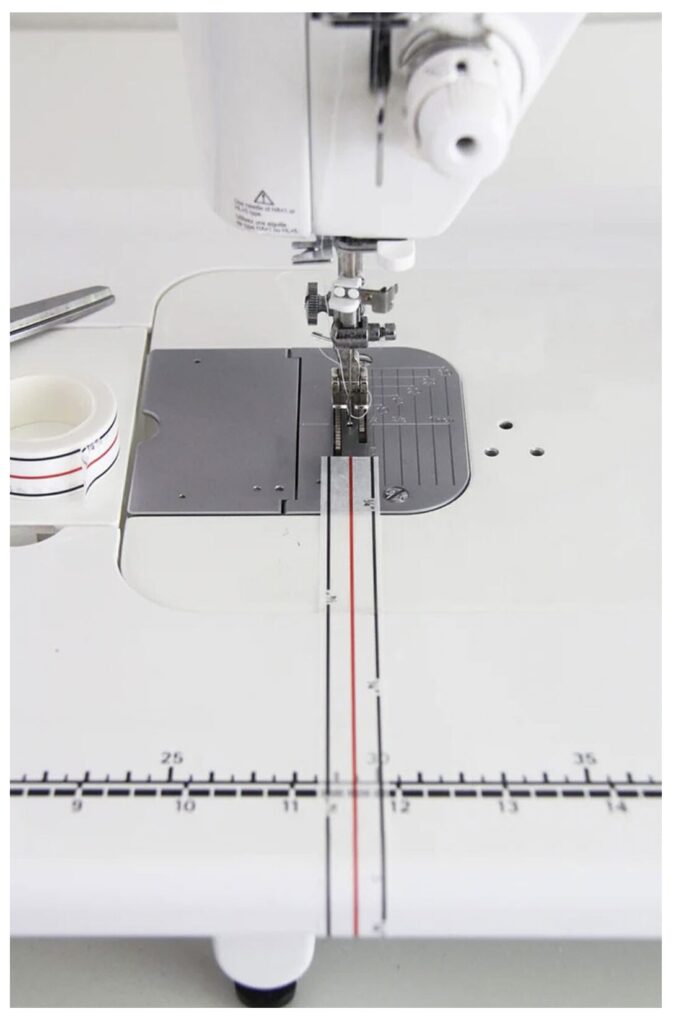
Problem solved: Properly installed, this tape allows me to line up the edge of my fabric 3-5 inches ahead of the needle. No more narrower seams at the beginning or end of my stitching line. It’s a visual guide only – there is no ridge or bumper to run the edge of the fabric against.
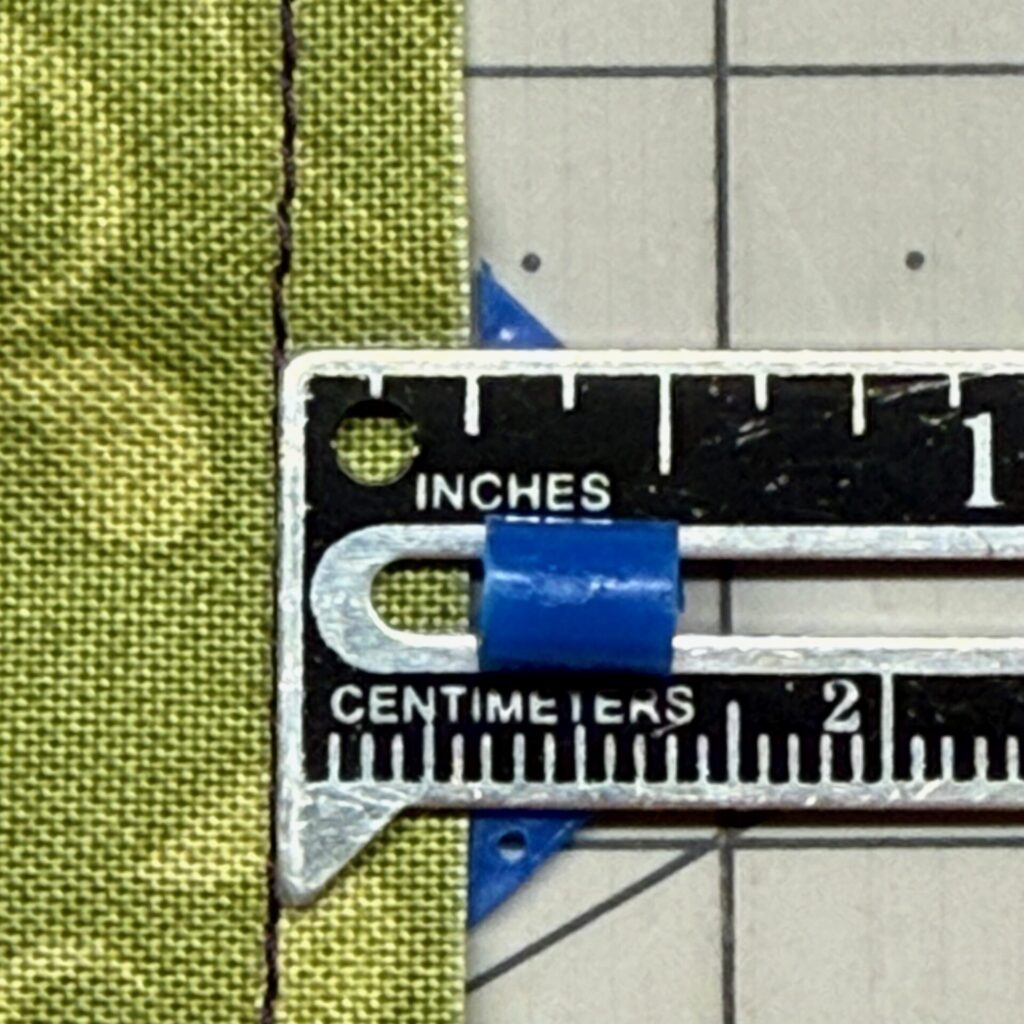
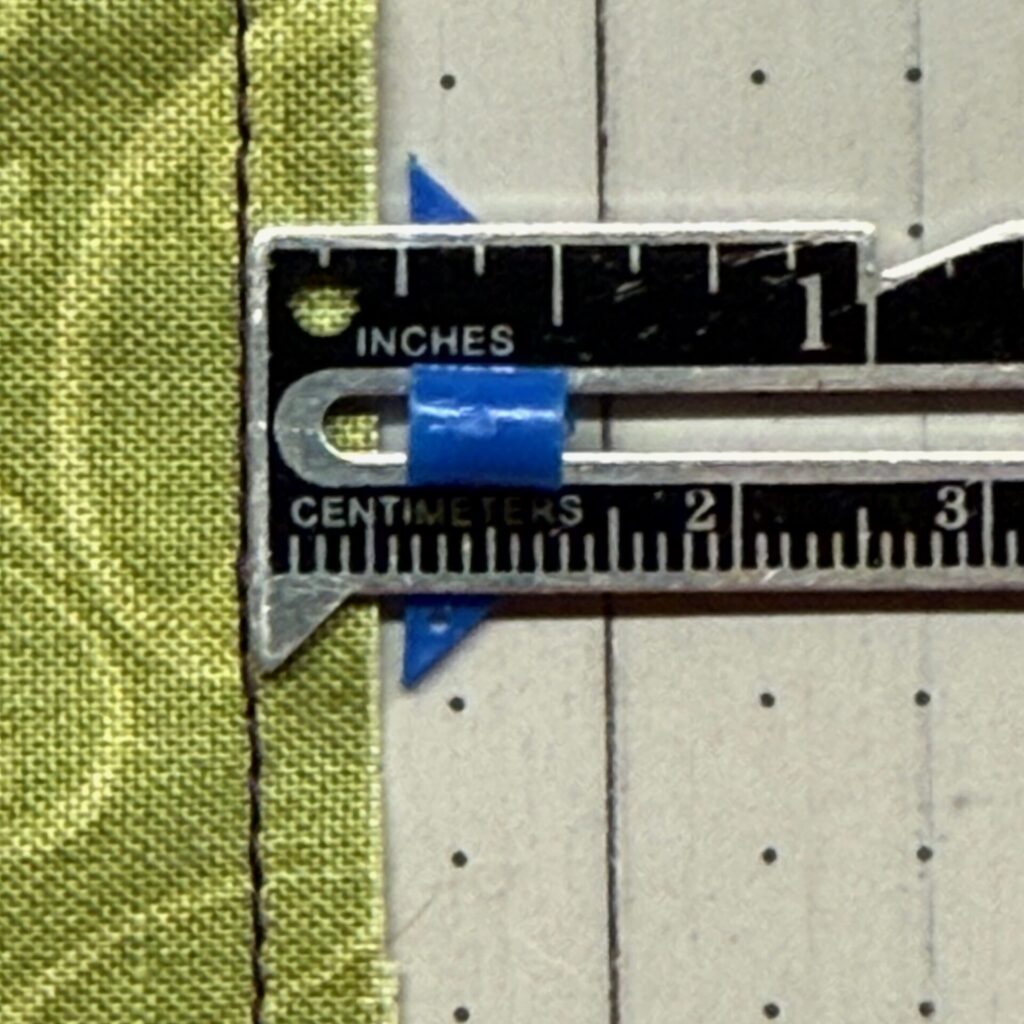
Seam Width Gauge:
This little seam width gauge is so handy! Accurately position your needle for perfect seams. I keep one of these next to my machine – and another in the tote with my spare/traveling machine.
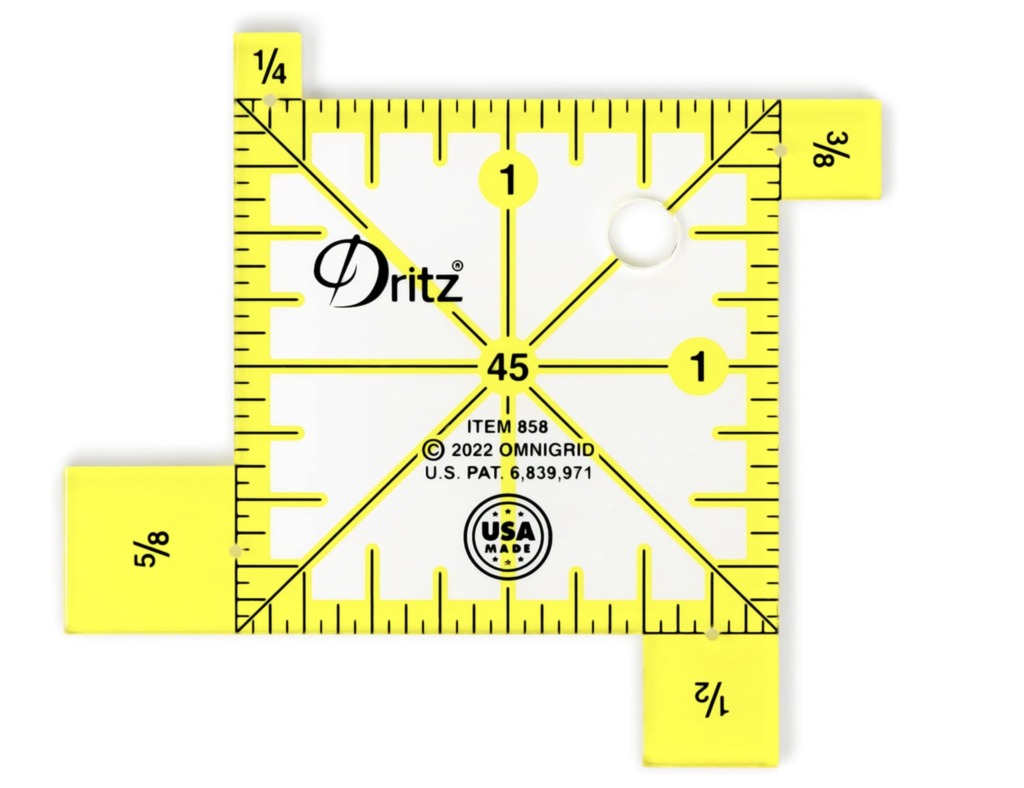
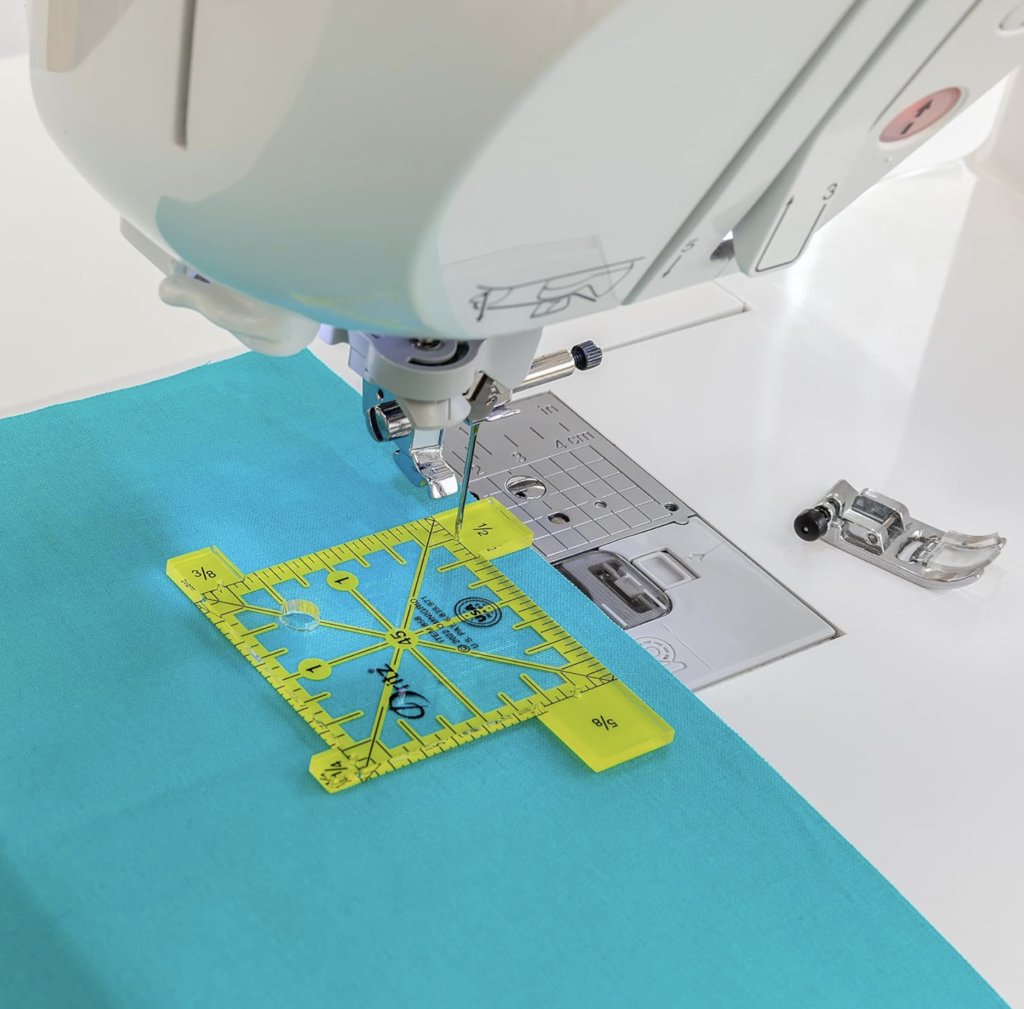
Problem solved: Quickly see if your seams are perfect by using one of the [4] included measurements to check the seam width. If there are issues, correct them before moving on with more stitching.
Dritz Sewing Gauge:
I have used this sewing gauge for as long as I have been sewing. Why? Because I can check my seams and know for certain that they are perfectly accurate. It’s also perfect for measuring almost any size of hem.
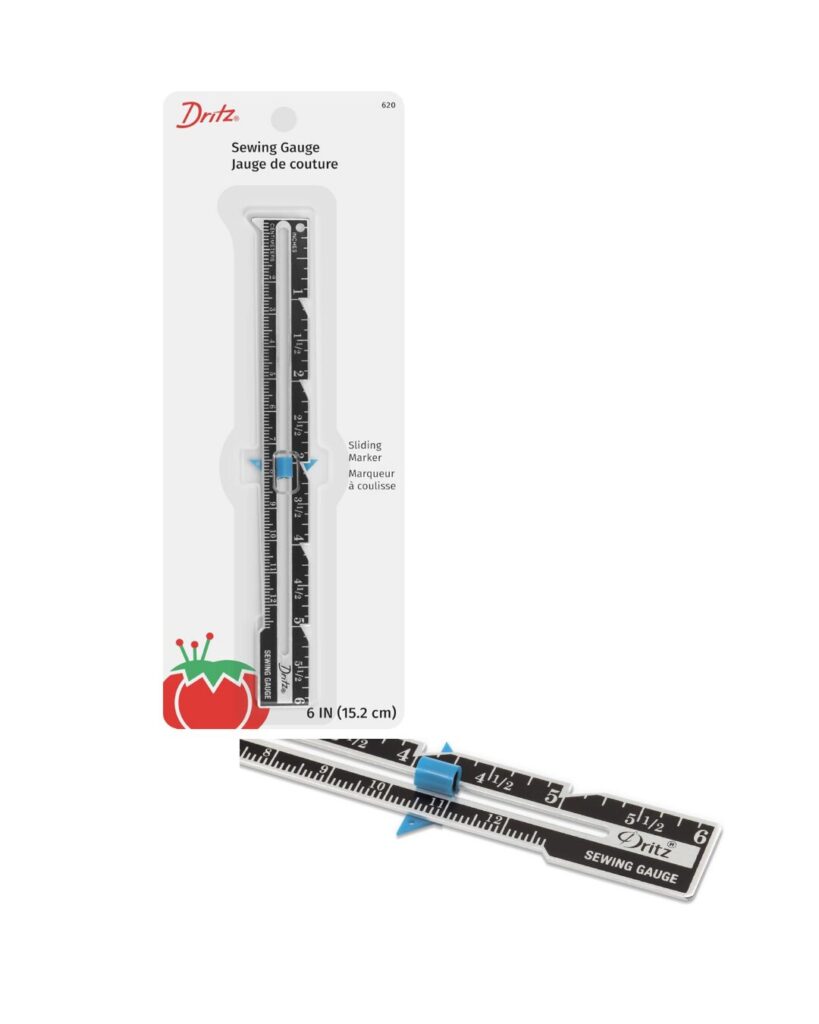

Problem solved: I love this tool because I can quickly set it for any size seam (or hem) I want – up to 6 inches. I can run this tool along the seam and note any areas that need to be corrected. I got my first version of this handy tool at 12 – and it came from JCPenney’s – back in the day when they had a complete fabric department. I won’t do the math for you, but if you know, you know. I’m on my second sewing gauge now – and I’ve been using it for years.
Sewing Edge:
I love these little purple “bumpers” – Sewing Edge strips are easy to apply and remove. To use, apply the sewing edge to your machine (measure from your needle to the width of seam you want (usually 1/4-inch) and guide your fabric along the edge for straight, accurate seams.

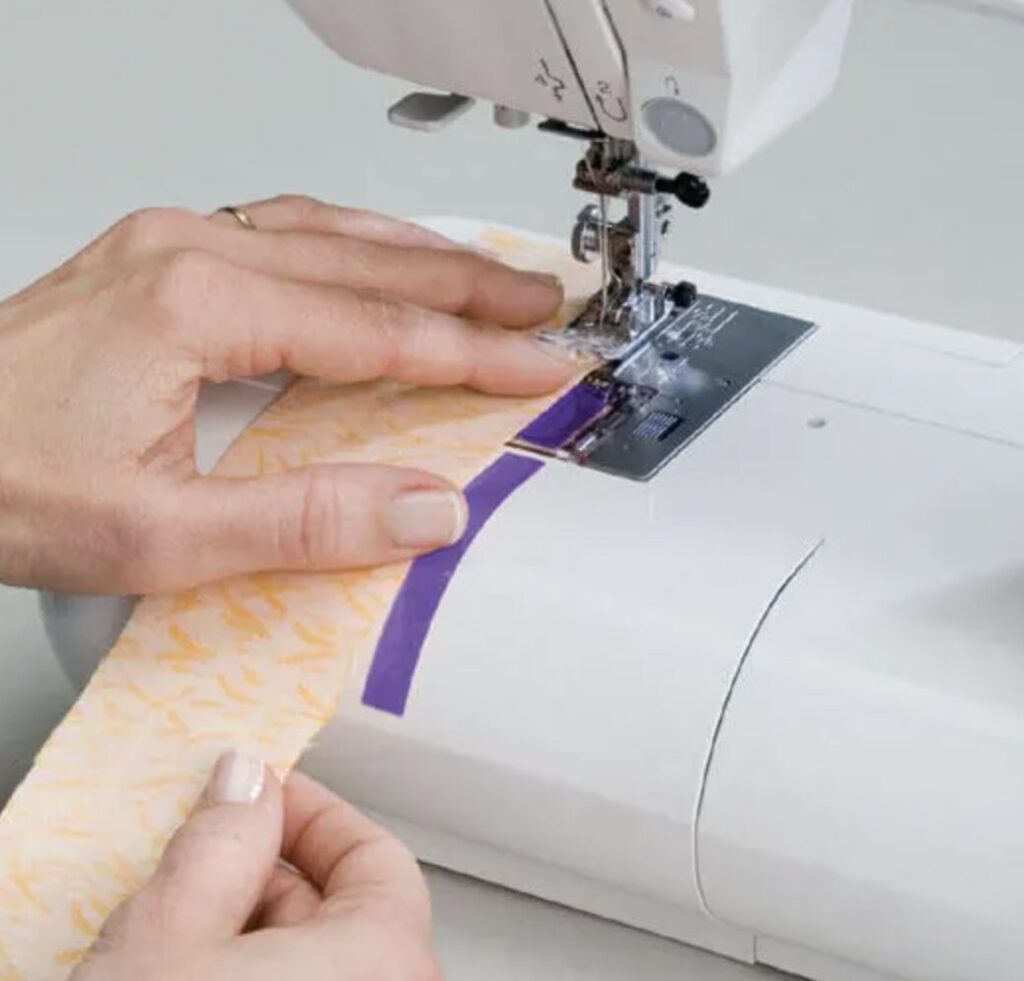
Problem Solved: These little bumpers give you a “ridge” to place your fabric against which can be very helpful in guiding the fabric in the correct position on its path to the needle. Consider using the Sewing Edge bumpers in combination with the Diagonal Seam Tape.
Singer Stitch Gauge and Guide:
A two-piece tool used to sew precise, professional-looking hems and seams. Pre-drilled gauge holes for seam allowances measure between 1/8-inch and 1-inch in width. Reusable and repositionable adhesive guide.
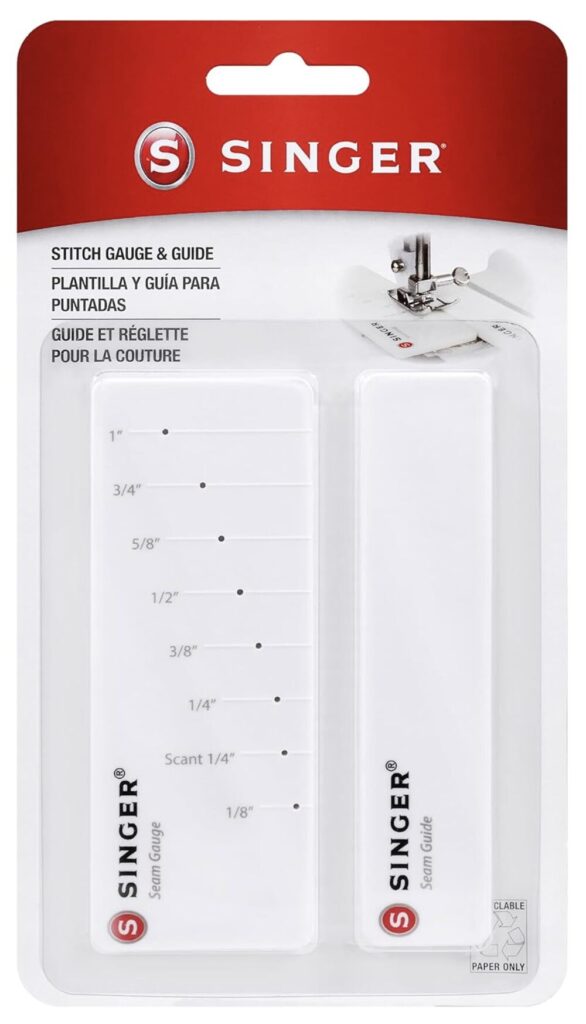
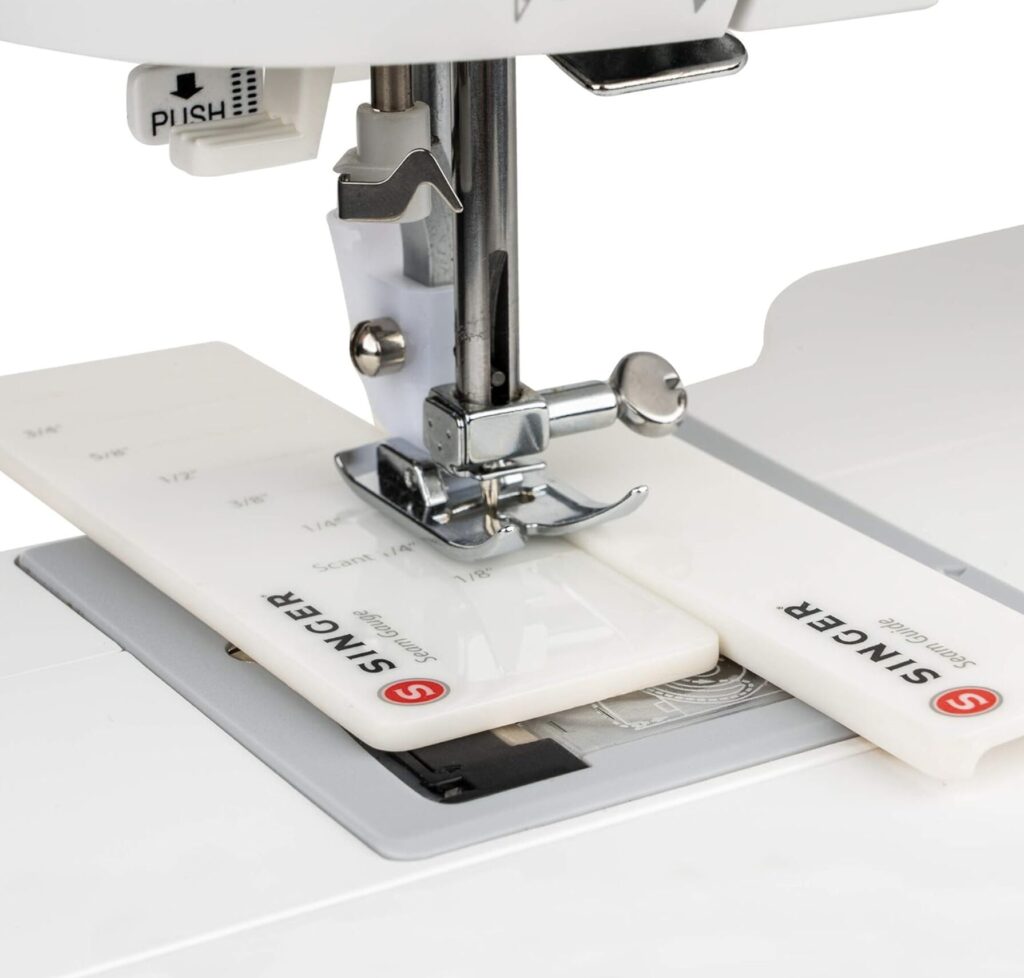
Problem solved: The gauge piece allows for very precise measurement of the needle, including a scant 1/4-inch. Once the gauge is in place, add the guide right next to it, extending forward of the needle, and adhere it in place (it comes off easily and is reusable). The guide gives you a ridge to guide your fabric as it approaches the needle. Remove the needle gauge – and you are off to the races!
Sewing Machine LED Light Strip:
This LED light strip attaches to the top of your machines throat area, adding lots of extra light in what normally is a pretty dark space.
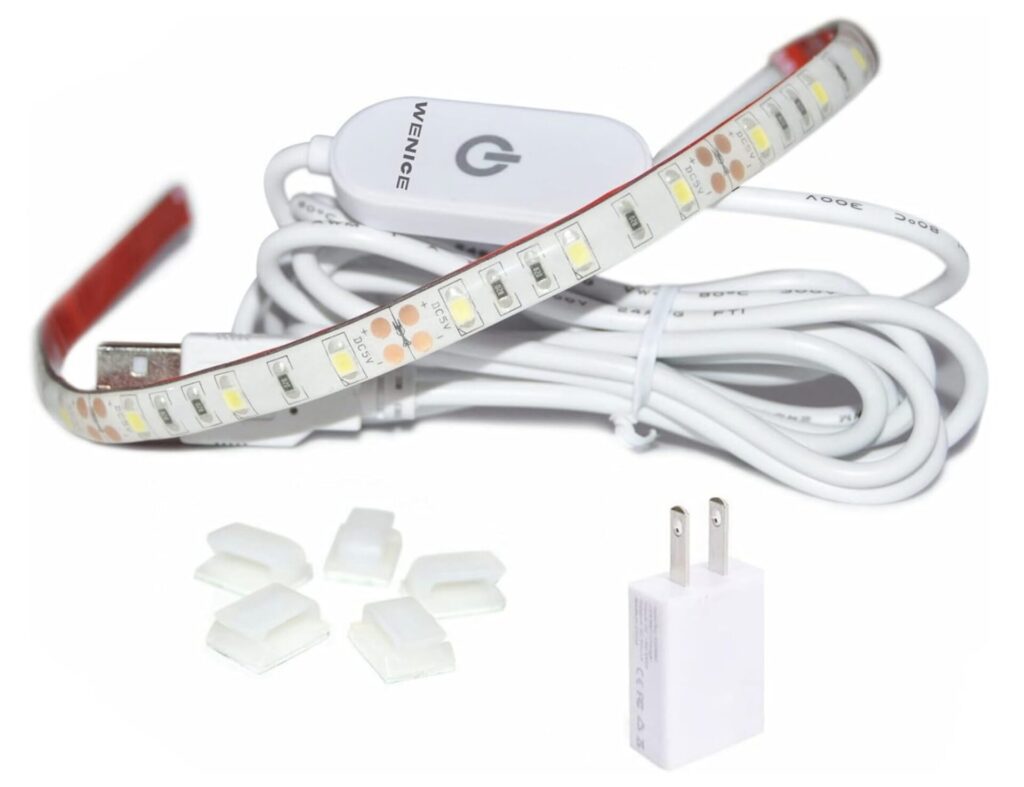
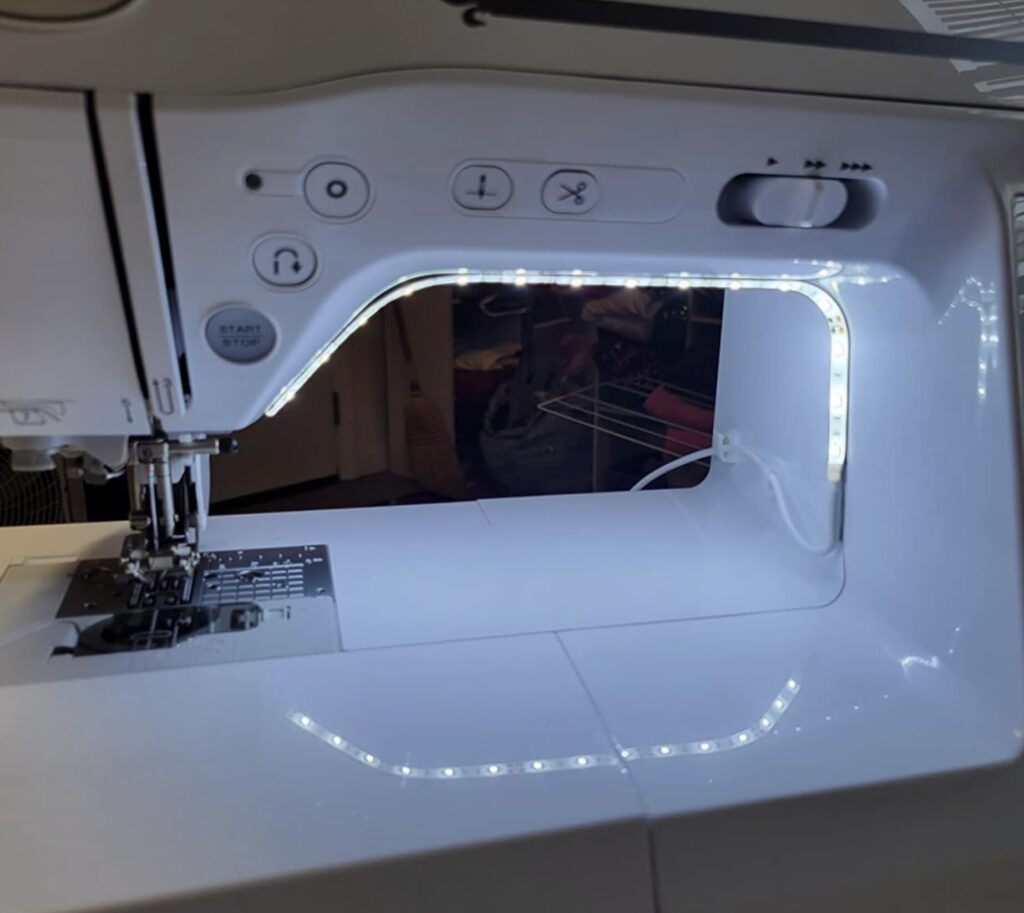
Problem solved: Sometimes our stitching issues stem from our inability to see what we are doing clearly. Adding some light to the area can make a huge difference.
Tools don’t replace skill and experience; however, even the most experienced stitchers can use a little guidance to ensure the accuracy of our seam allowances.
Even with years of experience, seam accuracy still requires attention.
- Our machines change.
- Our fabrics change.
- Even our stitching rhythm changes from day to day.
Checking your seam allowance isn’t a beginner habit — it’s a lifetime habit.
A Simple Test That Tells You Everything
Before starting a project (or even a stitching session), try this quick check:
- Cut three strips of fabric (e.g., 1-1/2 inches x 5 inches)
- Sew them together using your usual seam allowance
- Press the seams (the way you normally would)
- Measure the finished width
If your seams are accurate, the final piece should measure exactly 3-1/2 inches x 5 inches.
If it doesn’t? Adjust your seam allowance slightly until the correct measurement is achieved.
Troubleshooting Your 1/4-Inch Seam
Even when you think you’re sewing a perfect 1/4-inch seam, your quilt blocks will tell the truth. If something isn’t lining up, here are a few common issues — and how to fix them.
[1] If Your Blocks Are Too Small … Your seam allowance is likely too wide.
What’s happening: Each seam is taking a bigger “bite” out of your fabric than it should.
Try this:
- Stitch just slightly closer to the fabric edge
- Check that your fabric is aligned correctly with your seam guide
- Test your seam with a sample strip set before continuing
[2] If Your Blocks Are Too Large … Your seam allowance may be too narrow.
What’s happening: You’re not taking quite enough fabric into the seam.
Try this:
- Move your stitching line just a thread or two farther in
- Double-check your needle position (if adjustable)
- Use a guide to keep your spacing consistent
[3] If Your Points Don’t Match … Your seam width may be inconsistent.
What’s happening: Some seams are slightly wider or narrower than others.
Try this:
- Slow down your stitching speed
- Focus on keeping the fabric edge aligned with your guide at all times
- Avoid watching the needle — watch the edge of the fabric instead
[4] If Your Rows Won’t Line Up … Seam allowances may be varying across multiple blocks.
What’s happening: Small differences are adding up across the row.
Try this:
- Recheck your seam with a test sample
- Measure a few finished units to spot inconsistencies
- Pin at seam intersections to help ease things into alignment
[5] If Your Fabric Seems to Shift or Stretch … Fabric handling (not seam width) may be the issue.
What’s happening: Pulling, pushing, or aggressive ironing can distort your pieces.
Try this:
- Let the feed dogs do the work—don’t push or pull
- Press seams gently instead of ironing back and forth
- Use pins as needed to stabilize layers
[6] If Everything Looks Right… But Still Doesn’t Fit … Welcome to the world of the scant 1/4″ seam.
What’s happening: Fabric thickness and pressing are affecting your final measurements.
Try this:
- Stitch a scant 1/4″ seam (just slightly less than a full 1/4″)
- Re-test using a simple strip set
- Adjust until your finished measurement matches the pattern
One Last Tip
When in doubt, don’t guess — test.
A 2-minute test strip can save you hours of frustration later (and possibly a date with your seam ripper).
Happy stitching!